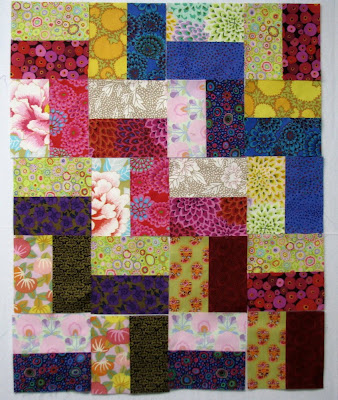
This tutorial is for the 3 quilts with blocks made up of 2 rectangles. I don't cut rectangles though. I piece strips together. Cut your strips any width you want. I used 2.5" in one quilt, 3" in the next and this one is using 3.5".
After piecing 2 strips together, measure the width. That is the size you will cut at. I have had several questions about what size I cut them. It has to be the same measurement as your sewn width or they won't be squares.
Place the bottom edge of the first strip along a line on your cutting mat. Start about 10 lines up from the edge closest to you. The left edge should be overlapping a line too.
Stack the strip sets one at a time on each of the lines below the first one (one strip set per line) so you have them staggered and no seams are on top of each other.
Trim the left edge along the line that it is overlapping.
This is just a tiny trim to even up the edges.
Make as many cuts as you can (remember the cut size is the same size as the sewn width). I got 2 out of my sets and then got one strip the same width as my cut strip size (bonus).
The bonus cut will make 4 patches for another quilt.
Now the fun begins. This is one pattern you can use these blocks for. To keep all of your pieces twisting in the same direction like a blade or pinwheel, always have the upper left piece in the same position. I chose vertical with the darkest color on the right. If you happen to make the upper left one in a horizontal position it won't work with this layout that I am showing. You would need to "unsew" or you have 2 quilts started with blades twisting in opposite positions in each, LOL!
The next layout is a stairstep layout. You will notice that the blocks are only in 2 positions and are repeated through the quilt. I only focus on the light fabric, and it is in the top and left position all through the quilt.
If you tip your head one way (I did it for you with the camera) you get horizontal zig zags rows which would either get trimmed on the outer edges or you would need setting triangles to fill in the edges. I did that here (scroll down to second quilt).
If you tip it in the opposite direction, you get vertical zig zag rows.
This is a simple quilt, basically a 2 strip rail fence block, but it would look great in almost any kind of fabric. If you are using small prints, cut your strips narrow (2-2.5"). If you are using larger prints cut the strips wider (3-3.5"). I will use a 4" strip if I make it out of flannel fabrics.


19 comments:
Good Tut. Everyone should learn from this one. colors are vivid and it makes a nice quilt. Chris
Great cutting advice Wanda. Everyone should be taught cutting tricks when they start, it can make quilting so much more fun.
Thanks for that tutorial. I often lay my strips out but never thought of overlapping them. Duh! It will be much easier to keep them straight that way. I love the pinwheel layout.
Wonderful post!
Great tips, Wanda! I learned the hard way on a mini roman stripe quilt last week. I was using leftover strips anyway, but, well, the mini is quite mini now once I squared up my blocks!! Lesson learned:)
Great tutorial! This is such a versatile block. And I like the way you stack the strips to cut.
Great tutorial thanks for taking the time to do that for us.
Thank you for the tut Wanda.
Wonderful cutting hints. It makes all the difference in the accuracy of your quilts.
Hi Wanda, Thanks, Thanks, for the great
tutorial!! Have a good weekend! jmh
Love your colors! This a really lovely planned scrappy Rail Fence design I think! I took a class from Mary Ellen Hopkins REALLY way back when and Rail Fence was always one of the first quilts she used to teach!
I've staggered strip sets when cutting diamond strips for simple Lone Star piecing. Makes the cutting go so much faster. Your tutorial was so clear with your excellent photos! Thank you!
This is very nice--and easy. I like that you get bonus pieces for another project.
Hi Wanda,
Thank you for the tutorial. It helps to see someone else's process. I'll be doing some of these block this weekend just for fun.
Keep cool!
Vicky F
This is a great tutorial -- gave me an idea of what to do with a jelly roll.
Great tutorial. Nice you showed them how to cut more than one at a time too.
Wanda, you are just the most instructional, inspirational quilter I almost know! Thank you for this great bunch of ideas.
Wanda, thanks for a great tutorial. I came over from Muddling Through and I would like to make a quilt like this.
Your tute is so easy to follow. Thank you. I will certainly use my scraps for this.
I love this pattern and the cutting tips
Post a Comment