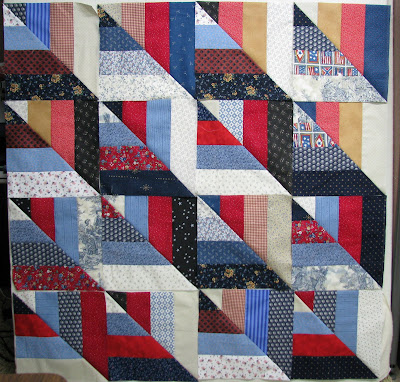
Sew strips together into stratas. Press the seams toward the darkest strip. Layer them right sides together with colors going in opposite directions as seen above. Seams will be going opposite directions for easy matching.
 Measure the width of the stratas and cut blocks that size. Cut in half diagonally and sew the 2 sets of triangles into blocks.
 Place the blocks with the 'eye' in the same position on all of them, alternating the 2 kinds of blocks. It will automatically form a twisting pattern with a light twist and a dark twist. You can make it scrappy or in just 4 fabrics.


.jpg)
23 comments:
I really like the look of these blocks. They not only twist, but they look so deep as well, like an attic window block. Thank you so much for sharing the 'how-to,' you are very generous!
Heather
This is a great block! I have never seen it done where it twists. I like that look.
Sometimes the smallest of things takes you off into another whole directions. The simple cut and the look is totally different. Neat move to producing another look. Chris
Love this. Thanks for the tutorial.
Thanks Wanda, I could have figured it out, but I probably would have wasted some fabric along the way. You make everything look so easy!
thanks for sharing how you did this.
Karen
http://karensquilting.com/blog/
I love the movement of these blocks. Great way to use up some scraps too. Thanks for sharing your technique!
I love it! Yesterday, I was drawing it in Powerpoint to figure it out and my kids thought it was really cool. Thanks for the tutorial!
Ohhhhh - love this! Thanks for putting together and sharing the tutorial!
Thank you so much Wanda. This is a great tutorial I like the look of this one and sure will give it a try.
Thanks so much for sharing this block and quilt. I haven't seen it done like this before. Love the look and how it twists.
Laura T
Great tutorial and wonderful color choices. The values makes all the difference in the twist effect. Thanks for sharing.
I always enjoy learning from your tutorials. This is I could do now. ☺
Thank you J~MT
Beautiful Wanda. Thank you.
That is too cool. I wonder how it would look with wonky strips. I am definitely going to try this one.
Another terrific tutorial from the Great One! Thanks so very much for bringing a Rail Fence worthy of piecing to us!!!!
You. Are. Wonderful.
Hi Wanda,
Hey, I think I have some of those fabrics you're showing in the first picture!
Thanks so much for the tutorial on the rail twist. I have some fabrics in mind for this technique. What an illusion!
Any thoughts on how to quilt it (i.e. quilted following the twisted rails?) Or maybe this would be better served by straight stitching and let the fabric do the talking.
Vicky F
Thank you for the tutorial on the rail twist. I have been looking for something not to complicated and this fills the bill.
What a great idea! Thank you for sharing this tutorial. I can't wait to give it a try. :-)
Here it is July 2014 i saw this recipe and jumped in with both feet. I used black and whit scraps from a jelly roll . Way too cute R2Rock Hill SC
I have been looking for 2 days to figure out what project to make next. I think I just found it! Thank you.
I am a beginner and am having a hard time trying to figure out how big the block should be. My strips are 3 and 1/2 inches wide and 4 colors. Is there a video that goes with this pattern? Thank you.
Great pattern! Thanks for sharing :-)
Post a Comment