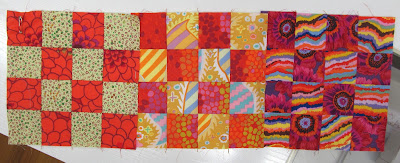
I opened up both of the setting triangle choices and slipped them in behind the corners of the blocks on the right.
This is the first diagonal row in the top left corner. If you enlarge the photo you will see the safely pin in the top left corner and the straight pins holding the blocks together. By pinning the rows together I can take down 2 rows to run alternately through the sewing machine.
The blocks are overlapped and then pinned with a straight pin.
The safety pin in the corner reminds me that it is the left end of the row.
I start sewing the blocks together from the right end so the pinned row can lay flat on my sewing cabinet and the sewn end gets folded over to sew each block on to the row. That way no pins come loose.
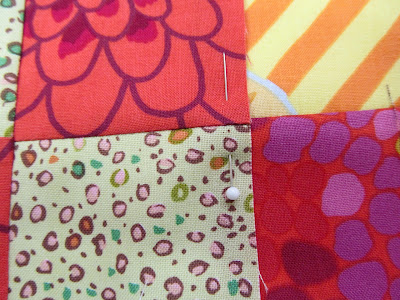
Here is a close up of the 2 choices for setting triangles.


At first I thought the backgrounds were similar enough that it wouldn't matter or you could use both. When you look at the close up though, the top one has a big flower that is shouting at us to be seen. The bottom one is more blend-y! BTW, love the bright color scheme of this one!
ReplyDeleteI agree that the bottom one blends if you are looking for that effect....
ReplyDeleteyou are making progress on this one...hugs in the pouring rain Julierose
For my eye... the difference is subtle, the second is a bit brighter with the added touch of the green. Ultimately, not much of a difference at least in pictures. Might read a little differently in person. I bet the room looks/feels really warm with that quilt on the wall.
ReplyDeleteOh, this is going to be another gorgeous quilt! Both of the fabrics you are considering for setting triangles are worthy. Like someone else mentioned, I wondered about using both or even more than two if you have others to consider. That Kaffe print, in your close up photos...the light colored background with colored pebbles (is it called Sand Pebbles?)...is one of my favorites. I am hoarding that fabric. It goes with everything. I am on a mission now to use my hoarded fabrics. I have vintage fabrics that belonged to my great aunt who died about 30 years ago at age 98. I need to use my “saved” fabrics and experience the pleasure of seeing them in a quilt.
ReplyDeleteI like the top print best. It pulls and accents the reds in the blocks giving the quilt zing. The bottom smaller print just blends with the oranges in the blocks and is just another orange border. Just my view from the pictures. Have a wonderful day sewing.
ReplyDeleteAASEWS
If you'e taking votes I vote for the top one. Love the effect of those flowers! I like how you put choices up for yourself and for others to comment on.
ReplyDeleteI'm so glad you mentioned using a safety pin to indicate position. I use a pin for the same purpose, which is not as good! It can fall out or I can prick myself with it. Don't know why it never occurred to me to use a safety pin! Thanks for the tip!
ReplyDeleteI use the pin in the corner reminder too to make sure it goes back oriented the correct way. My pin is always in the top right side, though!
ReplyDeleteLove this on point and really like the setting triangle options.
The other day I thought I liked the shaggy better for the setting triangles, but now I think I prefer the cactus dahlia. but either one is pretty good!
ReplyDeleteI wish I could sew these blocks together without pinning the seams. I'm just not quite there yet. And I always mark the first block in the row with a pin. I love how efficiently you work!
I just love this quilt! It's beautiful on its own, but setting it all on point was a great decision!
Thank you so much for explaining about pinning the rows together and starting from the right side to sew. That will help me get the blocks in the correct order next time. A wonderful tip! Love your blog.
ReplyDeleteThank you for sharing your pinning blocks method.
ReplyDeleteAs for the setting triangles fabric choice, I prefer the upper one.
I love the lower fabric (have some to back a quilt in the making) but for your setting triangles, the top one seems to fit better.
ReplyDeleteIt seems like the fabric in the top photo keeps the temperature of the quilt constant. The bottom option seems to have a lot more green, thus might cool the overall warmth of the quilt.
ReplyDeleteEnjoyed the preferences of those above commenters. I'm not going to even mention which one I prefer cause it's the same one you are going to select. 😉
ReplyDeleteJJM
That's the first time I've been able to use an imogi from my computer. Did it come through at your end ?
ReplyDeleteBoth are great choices, but I would likely choose the second. That is really a wonderful quilt on point with those great setting triangles.
ReplyDeleteThis is going to be one gorgeous quilt! I use a pin to orient my rows/top, too, and also put it in the upper left corner. The bottom fabric would be my choice for the setting triangles. My eye wants to go right to the top one and stops there. You will choose the right one, though. You always do!
ReplyDeleteIt is definitely tricky to sew a quilt on point. You have a great system.
ReplyDeleteI really like blocks on point, but I hate sewing them together. That king sized quilt I just made was a real struggle with those long rows!
ReplyDeleteFast forward to January 2026 and I am late to the quilting party. I love bright colors too and Kaffe Fassett is my favorite. My question is, is this quilt that I will call the 16 squares block, is this pattern in one of Kaffe's Quilting Books. ?? Or the pattern's name. ?? My granddaughter wants me to make her a quilt. Any information is appreciated. My email is judypriddy46@gmail.com. ♡♡♡♡ Thank you so much. !! Happy Quilting ☆☆ I saw this one on Pinterest. **
ReplyDelete